| Nouveau projet | New project |
|
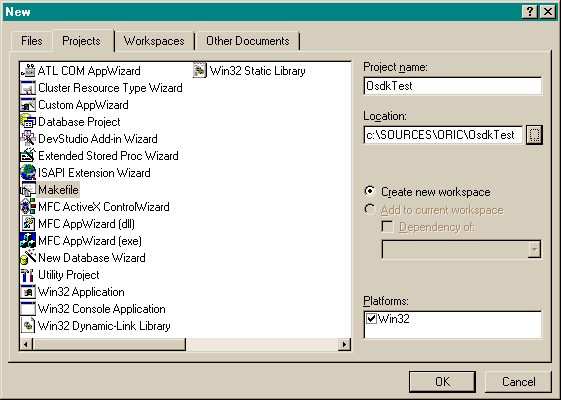
Avant de faire la configuration d'un projet, il faut déja que vous ayez téléchargé et installer le OSDK (voir à la page précedente). Une fois que c'est fait, l'idée consiste simplement en le fait de lancer les bon fichiers .BAT directement depuis l'interface de Visual Studio. Une fois que tout ceci est fait, lancez Visual Studio, et allez dans le menu "fichier/nouveau" ce qui fait apparaitre le formulaire qui suit. Evidement, remplacez "OsdkTest" par le nom de votre propre projet ! |
Before creating a new project, you have to download and install the OSDK (see on the previous page). When this is done, the idea is simply to run the right .BAT files from the Visual Studio IDE. If the configuration is correctly done, launch Visual Studio, and go to the menu" "file/new". The following formular appear. Of course, you should replace "OsdkTest" by the name you want to give to your own project ! |
| Configurer l'assistant | Appwizard configuration |
|
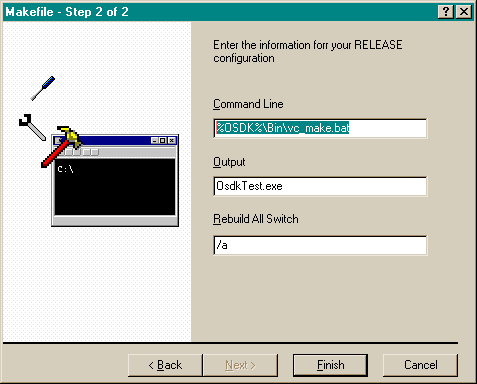
Ensuite, vous n'avez qu'a remplir correctement (suivez l'example) les deux formulaires de l'assistant de création de projet. Pour l'instant il n'y a aucune différence entre la version DEBUG et RELEASE, mais il est possible qu'a terme il sera effectivement possible de s'en servir. |
Now, you simply have to correctly fill (follow the example) the two dialog boxes of the app wizard. Right now, there are no differences between the DEBUG and RELEASE versions. Anyway, in the future it's possible that it will be used. |

| Modifier la configuration | Modify the configuration |
|
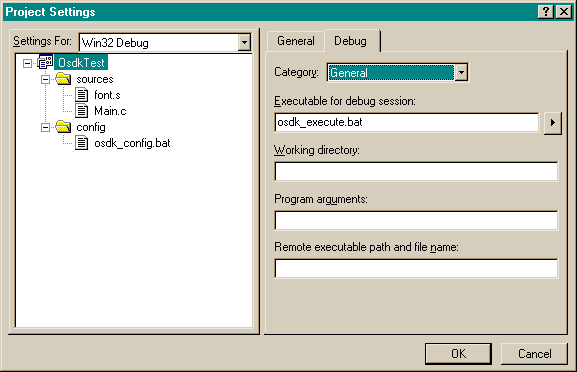
Si plus tard vous devez apporter des modifications, (Ou bien si vous n'avez pas configuré le OSDK lors de la création du projet), vous pouvez toujours le faire en allant dans le menu "projet/paramétrage", qui fera apparaitre les boites de configuration suivantes. |
If you later need to change the configuration (or if you do not make the right configuration during the project creation), you can go to hte "project/settings" menu, that will display the following dialog boxes. |

| Utilisation | Usage |
|
La configuration est maintenant terminée. Vous pouvez lancer la compilation en appuyant sur F7 (Icone Build), et lancer le programme (par l'intermédiaire de l'émulateur) en appuyant sur la touche "Execute program" (F5). Amusez vous bien ! |
The configuration is now terminated. You can launch the compilation by pressing the F7 key ("Build" icon), and run the program (using the emulator) by pressing the "Execute program" key (F5). Have fun ! |


